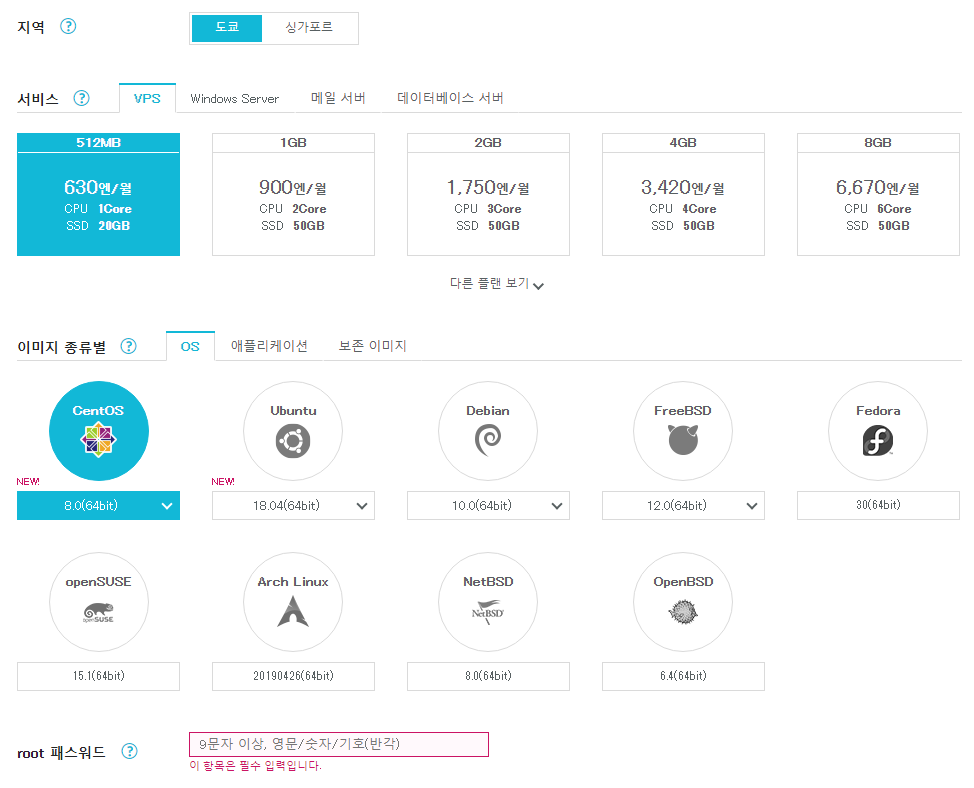
Conoha 에서 CentOS 8.0 이미지를 지원하는군요~

새로나온 버전을 테스트 해보기 좋습니다~ ㅎ

참고로 iwinv.kr 에서도 CentOS 8.x 버전을 지원합니다.

다른곳은 아직 확인해 보지 않았습니다.

Conoha CentOS 8.0

# php -v ( 혹시나 하고 PHP를 설치후 버전을 확인해보니 7.2 버전입니다~ )
PHP 7.2.11 (cli) (built: Oct  9 2018 15:09:36) ( NTS )
Copyright (c) 1997-2018 The PHP Group
Zend Engine v3.2.0, Copyright (c) 1998-2018 Zend Technologies


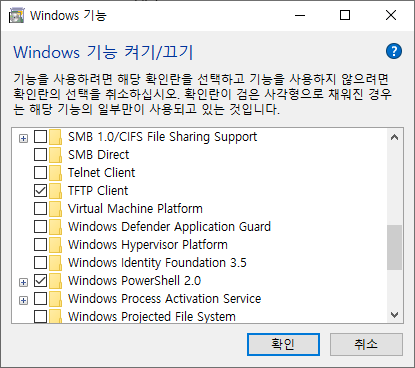
서버 생성하고 잠시 테스트 해봤는데, 7.x 버전에서는 ifconfig, netstat 같은 명령어가 디폴트로 지원하지 않아 yum 으로 설치를 해주어야 했는데 8.0 부터는 기본으로 지원을 하는건지 코노하에서 미리 집어넣었는지는 정확하게 모르겠네요~

아무튼 좀 편해진것 같습니다.


# pstree
systemd─┬─NetworkManager───2*[{NetworkManager}]
        ├─acpid
        ├─2*[agetty]
        ├─atd
        ├─auditd───{auditd}
        ├─chronyd
        ├─crond
        ├─dbus-daemon
        ├─firewalld───{firewalld}
        ├─lsmd
        ├─mcelog
        ├─polkitd───8*[{polkitd}]
        ├─qemu-ga
        ├─rngd───{rngd}
        ├─rsyslogd───2*[{rsyslogd}]
        ├─smartd
        ├─sshd───sshd───sshd───bash───pstree
        ├─sssd─┬─sssd_be
        │      └─sssd_nss
        ├─systemd───(sd-pam)
        ├─systemd-journal
        ├─systemd-logind
        ├─systemd-udevd
        └─tuned───3*[{tuned}]

기본으로 실행되고 있는 데몬입니다.

pstree 명령어는 psmisc 를 설치하여야 명령어가 실행됩니다.


블로그 이미지

영은파더♥

가상서버호스팅 VPS 리눅스 서버관리 윈도우 IT

,

라이젠 7 3700X CPU-Z

IT제품 2019. 9. 10. 15:59

AMD Ryzen 7 3700X + ASRock B450M 스틸레전드 CPU-Z 정보입니다.

그리고 삼성 SSD EVO 970 Plus 500GB CrystalDiskInfo 와 CrystalDiskMark 도 첨부합니다.

AMD Ryzen 7 3700X CPU-Z

라이젠 3세대 CPU 중에 끝판왕은 아니지만 이 정도면 쓸만하겠죠~ ㅎ


ASRock Steel Legend 메이보드

업데이트 하기전에 3세대 CPU 를 인식하더군요~

조립 후 최신 바이오스 2.7로 업데이트 하였습니다.


인텔 i7-7900X vs AMD 라이젠7 3700X 벤치비교

i7-7900X 보다 좋다는 벤치네요~


삼성 SSD 970 EVO Plus 500GB CrystalDiskInfo

크리스탈디스크인포입니다.


삼성 SSD 970 EVO Plus 500GB CrystalDiskMark

m.2 답게 아주 빠른 속도를 보여주네요~


'IT제품' 카테고리의 다른 글

마이크론 SSD BX500 120GB CrystalDiskInfo  (0) 2020.01.13
UMIDIGI A5 Pro 스펙  (0) 2019.11.15
PCI Express & USB 버전별 전송 속도  (0) 2019.08.13
그래픽카드 성능순위 Passmark  (0) 2019.08.12
제온 X3450 GA-P55A-UD3R 오버클럭  (0) 2019.07.24
블로그 이미지

영은파더♥

가상서버호스팅 VPS 리눅스 서버관리 윈도우 IT

,

Acroeditor 를 잘 사용하다가 더블클릭시 잘 선택되던 단어가 아무런 반응도 없더군요~

설정값이 날아가는 경우도 있는가 보네요~

도구 -> 환경 설정 -> 편집기 -> 블럭 메뉴에서 아래와 같이 설정하고 적용하면 됩니다.

아크로에디터 환경설정

별거 아닌데 설정 위치가 바로 파악이 안되서 올려봅니다.


블로그 이미지

영은파더♥

가상서버호스팅 VPS 리눅스 서버관리 윈도우 IT

,

네이버 웹마스터 도구에서 사이트를 등록하려면 소유권 인증이 필요합니다.

메타 태그 인증으로 선택하고 고도몰 관리자 페이지에서 디자인 -> 전체 레이아웃 -> 상단 레이아웃

여기에서 메타태그를 삽입하고 저장하면 됩니다.

고도몰 쇼핑몰 네이버 웹마스터도구 사이트 등록

저장한 다음에 소유권 확인을 하고 계속 진행하시면 됩니다.


블로그 이미지

영은파더♥

가상서버호스팅 VPS 리눅스 서버관리 윈도우 IT

,

윈도우10에 기본적으로 있지만 디폴트가 비활성화라서 해당 기능을 켜주어야 합니다.

좌측 하단의 돋보기를 눌러서 Windows 기능을 검색해서 실행하면 아래의 화면이 뜹니다.

윈도우10 TFTP Client

스크롤을 아래로 내려서 TFTP Client 를 체크하고 확인을 누르면 됩니다.


블로그 이미지

영은파더♥

가상서버호스팅 VPS 리눅스 서버관리 윈도우 IT

,

iwinv 서버관리에 취약점 점검이 새로 생겼네요~

뭔가 싶어서 한번 해보았습니다.


iwinv 취약점 점검 서비스

한참을 기다려야 하나 봅니다~


결과 나오면 업데이트 하겠습니다.


24시간이 훨씬 더 지났는데 아직도 결과가 나오지 않는군요~

이렇게 오래 걸리지는 않지 싶은데 뭔가 문제가 있는가 보네요~


블로그 이미지

영은파더♥

가상서버호스팅 VPS 리눅스 서버관리 윈도우 IT

,

티스토리는 rss 만 제공되는데 sitemap.xml 도 제공되면 좋겠네요~

무료로 사이트맵을 작성해주는 사이트가 있긴 하지만 불필요한 url 까지 생기는 문제가 있어서,

파이썬으로 한번 만들어 소스코드 공개합니다.

포스팅 주소가 숫자로 된 티스토리 블로그만 해당됩니다.


# coding=utf-8
from urllib2 import urlopen
from bs4 import BeautifulSoup
import xml.etree.ElementTree as xml
import time

BLOG_URL = 'https://ivps.tistory.com/' ### 블로그 주소
if ( BLOG_URL[len(BLOG_URL)-1] != '/' ):
  BLOG_URL += '/'
post_end = 0
html = urlopen(BLOG_URL)
soup = BeautifulSoup(html, "html.parser")
for hr in soup.findAll('a', {'class':'link_post'}):
  tmp = hr.get('href')[1:]
  if ( tmp != '' ):
    max = int( tmp )
    if ( post_end < max ):
      post_end = max
print "post_end " + str(post_end)

### SITEMAP XML Create
sitemap = xml.Element('urlset')
sitemap.set('xmlns', 'http://www.sitemaps.org/schemas/sitemap/0.9')
print ('<?xml version=\'1.0\' encoding=\'utf-8\'?>')
print ('<urlset xmlns="http://www.sitemaps.org/schemas/sitemap/0.9">')
x1_1st = xml.SubElement(sitemap, 'url')
x2_lo = xml.SubElement(x1_1st, 'loc').text        = BLOG_URL
x2_ch = xml.SubElement(x1_1st, 'changefreq').text = 'always'
x2_pr = xml.SubElement(x1_1st, 'priority').text   = '1.0'
print ('<url><loc>' + BLOG_URL + '</loc><changefreq>always</changefreq><priority>1.0</priority></url>')
for i in range(post_end):
  url = BLOG_URL + str(i)
  try:
    html = urlopen(url)
    soup = BeautifulSoup(html, "html.parser")
    #print (soup.head.find("meta", {"name":"description"}).get('content'))
    x2_ur = xml.SubElement(sitemap, 'url')
    x3_lo = xml.SubElement(x2_ur, 'loc').text        = url
    x3_ch = xml.SubElement(x2_ur, 'changefreq').text = 'daily'
    x1_pr = xml.SubElement(x2_ur, 'priority').text   = '0.9'
    print ('<url><loc>' + url + '</loc><changefreq>daily</changefreq><priority>0.9</priority></url>')
  except:
    print (url + ' is not found')
  time.sleep(0.01)
print ('</urlset>')

#xml.dump(sitemap)
xml.ElementTree(sitemap).write('./sitemap.xml', encoding='utf-8', xml_declaration=True)

사용해 보시고 문제점이 있다면 댓글 남겨주세요~

생성된 파일을 공지사항에 첨부해놓고 해당 링크 주소를 웹마스터 도구에 제출하면 됩니다.


블로그 이미지

영은파더♥

가상서버호스팅 VPS 리눅스 서버관리 윈도우 IT

,

아파치 + 파이썬 연동 환경에서 파이썬으로 보낸 GET 및 POST 파라메터 값을 받는 방법입니다.

#!/usr/bin/env python
import cgi

print ("Content-type: text/html\n")
print ("p1 : " + cgi.FieldStorage()['p1'].value + "<br>")
print ("p2 : " + cgi.FieldStorage()['p2'].value + "<br>")

test.py?p1=v1&p2=v2


결과는 아래와 같이 나옵니다.

p1 : v1

P2 : v2


블로그 이미지

영은파더♥

가상서버호스팅 VPS 리눅스 서버관리 윈도우 IT

,

파이썬 urlopen 모듈에러

from urllib.request import urlopen
from bs4 import BeautifulSoup

위와 같이 작성하면 아래와 같은 에러가 납니다.

Traceback (most recent call last):
  File "t.py", line 2, in <module>
    from urllib.request import urlopen
ImportError: No module named request

urllib2 로 변경하면 됩니다.

from urllib2 import urlopen
from bs4 import BeautifulSoup

이제 다시 테스트 해보세요~


블로그 이미지

영은파더♥

가상서버호스팅 VPS 리눅스 서버관리 윈도우 IT

,

인코딩을 페이지에 맞는 euc-kr 또는 utf-8 로 바꿔주면 됩니다.

[root@ivps ~]# python
Python 2.7.5 (default, Apr  9 2019, 14:30:50)
[GCC 4.8.5 20150623 (Red Hat 4.8.5-36)] on linux2
Type "help", "copyright", "credits" or "license" for more information.
>>> import requests
>>> rs = req.session()
Traceback (most recent call last):
  File "<stdin>", line 1, in <module>
NameError: name 'req' is not defined
>>> rs = requests.session()
>>> post = rs.get('https://ivps.tistory.com/')
>>> print post.text
<!doctype html>
<html lang="ko">
<head>
    <meta charset="utf-8">
    <title>TISTORY</title>
    <link rel="stylesheet" type="text/css" href="//t1.daumcdn.net/tistory_admin/www/style/top/font.css">
    <link rel="stylesheet" type="text/css" href="//t1.daumcdn.net/tistory_admin/www/style/top/error.css">
</head>
<body>
<div id="kakaoIndex">
    <a href="#kakaoBody">본문 ���기</a>
    <a href="#kakaoGnb">�� ���기</a>
</div>
>>> post.encoding
'ISO-8859-1'
>>> post.encoding = 'utf-8'
>>> print post.text
<!doctype html>
<html lang="ko">
<head>
    <meta charset="utf-8">
    <title>TISTORY</title>
    <link rel="stylesheet" type="text/css" href="//t1.daumcdn.net/tistory_admin/www/style/top/font.css">
    <link rel="stylesheet" type="text/css" href="//t1.daumcdn.net/tistory_admin/www/style/top/error.css">
</head>
<body>
<div id="kakaoIndex">
    <a href="#kakaoBody">본문 바로가기</a>
    <a href="#kakaoGnb">메뉴 바로가기</a>
</div>

post.encoding = 'utf-8'


블로그 이미지

영은파더♥

가상서버호스팅 VPS 리눅스 서버관리 윈도우 IT

,